Original Posted By: "Pocono John"
Vincent,Great idea. Especially for those of us who haven't even tried any of this before.Thanks for chiming in I appreciate it.BrentRead this topic online here:http://forums.matronics.com/viewtopic.p ... ___Subject: Pietenpol-List: Front seat attach point
Pietenpol-List: Front seat attach point
Re: Pietenpol-List: Front seat attach point
Original Posted By: Peter Johnson
Hello,I'm trying to understand the back part of the front seat bottom. Where is the passengerweight going (besides that front support)? Where and how is the backof the seat attached? It appears it's going to be against the cross piece on theseat back. Is the seat just glued to that? Looking at photos on the web don'thelp.Thank you,--------JohnRead this topic online here:http://forums.matronics.com/viewtopic.p ... ______Date: Wed, 15 Feb 2017 13:10:13 +1100Subject: Re: Pietenpol-List: Front seat attach point
Hello,I'm trying to understand the back part of the front seat bottom. Where is the passengerweight going (besides that front support)? Where and how is the backof the seat attached? It appears it's going to be against the cross piece on theseat back. Is the seat just glued to that? Looking at photos on the web don'thelp.Thank you,--------JohnRead this topic online here:http://forums.matronics.com/viewtopic.p ... ______Date: Wed, 15 Feb 2017 13:10:13 +1100Subject: Re: Pietenpol-List: Front seat attach point
Pietenpol-List: Re: Front seat attach point
Original Posted By: "taildrags"
Very good idea, indeed. You can get your staple gun and a squeeze bottle of yellowcarpenter's glue to build your mockup so you don't have to fuss with mixingstructural epoxy and all of that. Of course you can use whatever wood is handyand available, and if you mess anything up, you aren't shedding big tearsover ruining a beautiful piece of Sitka spruce. In fact, if you split somethingwhile bending it, or if there's a knot that you don't want to bother takingout, you can just scab on a plywood gusset over it and keep going.--------Oscar ZunigaMedford, ORAir Camper NX41CC "Scout"A75 power, 72x36 Culver propRead this topic online here:http://forums.matronics.com/viewtopic.p ... ___Subject: Pietenpol-List: Re: Front seat attach point
Very good idea, indeed. You can get your staple gun and a squeeze bottle of yellowcarpenter's glue to build your mockup so you don't have to fuss with mixingstructural epoxy and all of that. Of course you can use whatever wood is handyand available, and if you mess anything up, you aren't shedding big tearsover ruining a beautiful piece of Sitka spruce. In fact, if you split somethingwhile bending it, or if there's a knot that you don't want to bother takingout, you can just scab on a plywood gusset over it and keep going.--------Oscar ZunigaMedford, ORAir Camper NX41CC "Scout"A75 power, 72x36 Culver propRead this topic online here:http://forums.matronics.com/viewtopic.p ... ___Subject: Pietenpol-List: Re: Front seat attach point
Pietenpol-List: Re: Front seat attach point
Original Posted By: Jack Textor
A couple more pictures for you John. "Pass Seat" photo: the rear of the seat is on the left. Note how there is a woodsupport piece across the seat back from the left side of the plane to the right.At the ends of this piece are two vertical pieces that stand on top of thewhite ash cross member. Also note how the seat bottom side rails also rest onthese two vertical pieces. The front area of the seat structure is also madein this same type of fashion."Pass Seat2" photo: the rear of the seat is on the right. This is an over viewof the finished product with added center support and gussets, but you can seefrom another angle how the seat structure was assembled. My seat top plywood is 1/4" thick and screws onto the structure. This will alsoadd some strength to the entire assembly.For future reference; I added a plywood stiffener under the rudder pivot supportbracket shown in "Pass Seat2".--------Mike PerezRead this topic online here:http://forums.matronics.com/viewtopic.p ... ttachments: http://forums.matronics.com//files/pass ... __________
A couple more pictures for you John. "Pass Seat" photo: the rear of the seat is on the left. Note how there is a woodsupport piece across the seat back from the left side of the plane to the right.At the ends of this piece are two vertical pieces that stand on top of thewhite ash cross member. Also note how the seat bottom side rails also rest onthese two vertical pieces. The front area of the seat structure is also madein this same type of fashion."Pass Seat2" photo: the rear of the seat is on the right. This is an over viewof the finished product with added center support and gussets, but you can seefrom another angle how the seat structure was assembled. My seat top plywood is 1/4" thick and screws onto the structure. This will alsoadd some strength to the entire assembly.For future reference; I added a plywood stiffener under the rudder pivot supportbracket shown in "Pass Seat2".--------Mike PerezRead this topic online here:http://forums.matronics.com/viewtopic.p ... ttachments: http://forums.matronics.com//files/pass ... __________
Pietenpol-List: Re: Front seat attach point
Original Posted By: "Speedbrake"
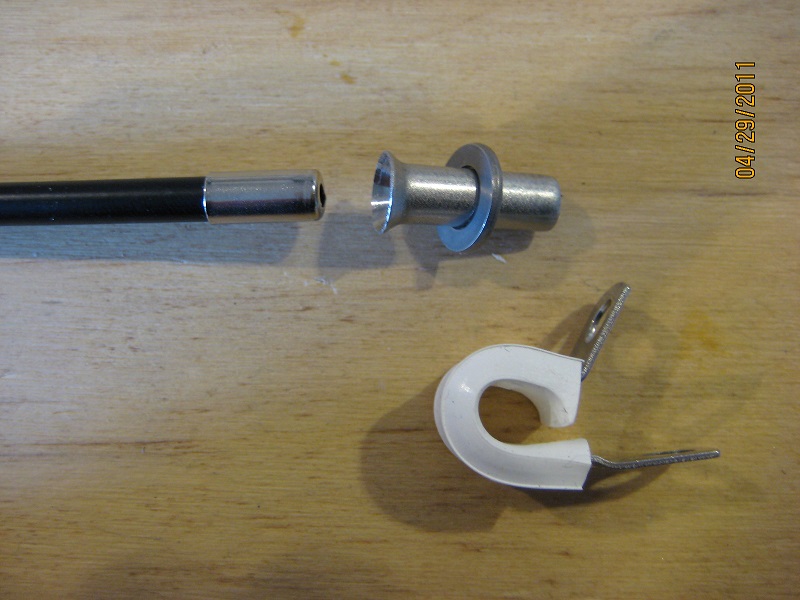
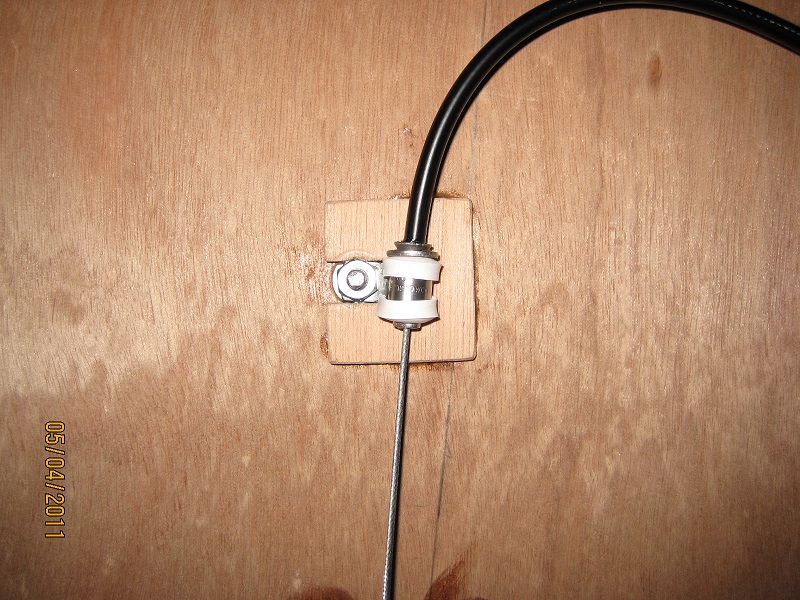
Jack, this is in response to your question from the "Front Seat Attach..." post.(Thank you for the kind words; by the way.)Yes, the items in question are heel "brakes". I say "brakes" because these arenot intended to be brakes as in to hold the plane during run up or to stop shorton a runway. This setup is to merely apply friction to the wheels in hopesof preventing a downhill run into another plane or into a fueling area.Pictures 1 and 2 demonstrate the break down of the pedals. Note the right sidewood block is contoured to give clearance to the inside radius of the 1/2" S.S.tube. The blocks are NOT drilled through so that the 1/4" S.S. pivot tube isfree to rotate. The 1/2" tube is also free to rotate on the 1/4" pivot.Pictures 3 and 4 show detail of the cable assembly at the pedals. I flared theS.S. tube and added a washer to prevent the black cable sheath from moving underthe clamp when applying the brakes. Not shown is the other end of this flaredtube. ( But I do have a picture.) It is rolled inward to prevent the blacksheath from pushing out. The wood "U" shaped gusset it epoxied around the clampto prevent it from rotating around its mounting bolt.Pictures 5 and 6 show the completed assembly with epoxied "T" nuts and the underbelly fabric stringers.--------Mike PerezRead this topic online here:http://forums.matronics.com/viewtopic.p ... ttachments: http://forums.matronics.com//files/brak ... ___Subject: Pietenpol-List: Re: Front seat attach point
Jack, this is in response to your question from the "Front Seat Attach..." post.(Thank you for the kind words; by the way.)Yes, the items in question are heel "brakes". I say "brakes" because these arenot intended to be brakes as in to hold the plane during run up or to stop shorton a runway. This setup is to merely apply friction to the wheels in hopesof preventing a downhill run into another plane or into a fueling area.Pictures 1 and 2 demonstrate the break down of the pedals. Note the right sidewood block is contoured to give clearance to the inside radius of the 1/2" S.S.tube. The blocks are NOT drilled through so that the 1/4" S.S. pivot tube isfree to rotate. The 1/2" tube is also free to rotate on the 1/4" pivot.Pictures 3 and 4 show detail of the cable assembly at the pedals. I flared theS.S. tube and added a washer to prevent the black cable sheath from moving underthe clamp when applying the brakes. Not shown is the other end of this flaredtube. ( But I do have a picture.) It is rolled inward to prevent the blacksheath from pushing out. The wood "U" shaped gusset it epoxied around the clampto prevent it from rotating around its mounting bolt.Pictures 5 and 6 show the completed assembly with epoxied "T" nuts and the underbelly fabric stringers.--------Mike PerezRead this topic online here:http://forums.matronics.com/viewtopic.p ... ttachments: http://forums.matronics.com//files/brak ... ___Subject: Pietenpol-List: Re: Front seat attach point
Pietenpol-List: Re: Front seat attach point
Original Posted By: "Pocono John"
Jack, see "Heel "Brakes"" post.--------Mike PerezRead this topic online here:http://forums.matronics.com/viewtopic.p ... ___Subject: Pietenpol-List: Re: Front seat attach point
Jack, see "Heel "Brakes"" post.--------Mike PerezRead this topic online here:http://forums.matronics.com/viewtopic.p ... ___Subject: Pietenpol-List: Re: Front seat attach point
Original Posted By: Jack Textor
Gentlementhank you for all the photos and your stories/explanations. I'll incorporatethose ideas into the construction.Thank you!--------JohnRead this topic online here:http://forums.matronics.com/viewtopic.p ... __________
Gentlementhank you for all the photos and your stories/explanations. I'll incorporatethose ideas into the construction.Thank you!--------JohnRead this topic online here:http://forums.matronics.com/viewtopic.p ... __________
Pietenpol-List: Re: Front seat attach point
Original Posted By: "Pietflyer1977"
Subject: Re: Pietenpol-List: Heel "Brakes"Excellent Mike thank you!Jack TextorSent from my iPad> On Feb 15, 2017, at 8:36 AM, Speedbrake wrote:> > > Jack, this is in response to your question from the "Front Seat Attach..." post.> (Thank you for the kind words; by the way.)> > Yes, the items in question are heel "brakes". I say "brakes" because these arenot intended to be brakes as in to hold the plane during run up or to stop shorton a runway. This setup is to merely apply friction to the wheels in hopesof preventing a downhill run into another plane or into a fueling area.> > Pictures 1 and 2 demonstrate the break down of the pedals. Note the right sidewood block is contoured to give clearance to the inside radius of the 1/2" S.S.tube. The blocks are NOT drilled through so that the 1/4" S.S. pivot tubeis free to rotate. The 1/2" tube is also free to rotate on the 1/4" pivot.> > Pictures 3 and 4 show detail of the cable assembly at the pedals. I flared theS.S. tube and added a washer to prevent the black cable sheath from moving underthe clamp when applying the brakes. Not shown is the other end of this flaredtube. ( But I do have a picture.) It is rolled inward to prevent the blacksheath from pushing out. The wood "U" shaped gusset it epoxied around the clampto prevent it from rotating around its mounting bolt.> > Pictures 5 and 6 show the completed assembly with epoxied "T" nuts and the underbelly fabric stringers.> > --------> Mike Perez> > > > > Read this topic online here:> > http://forums.matronics.com/viewtopic.p ... 237#466237> > > > > Attachments: > > http://forums.matronics.com//files/brake_452.jpg> http://forums.matronics.com//files/brake2_940.jpg> http://forums.matronics.com//files/brake3_626.jpg> http://forums.matronics.com//files/brake4_186.jpg> http://forums.matronics.com//files/brake5_117.jpg> http://forums.matronics.com//files/brake6_139.jpg> > > > > > ________________________________________________________________________________Subject: Pietenpol-List: Re: Front seat attach point
Subject: Re: Pietenpol-List: Heel "Brakes"Excellent Mike thank you!Jack TextorSent from my iPad> On Feb 15, 2017, at 8:36 AM, Speedbrake wrote:> > > Jack, this is in response to your question from the "Front Seat Attach..." post.> (Thank you for the kind words; by the way.)> > Yes, the items in question are heel "brakes". I say "brakes" because these arenot intended to be brakes as in to hold the plane during run up or to stop shorton a runway. This setup is to merely apply friction to the wheels in hopesof preventing a downhill run into another plane or into a fueling area.> > Pictures 1 and 2 demonstrate the break down of the pedals. Note the right sidewood block is contoured to give clearance to the inside radius of the 1/2" S.S.tube. The blocks are NOT drilled through so that the 1/4" S.S. pivot tubeis free to rotate. The 1/2" tube is also free to rotate on the 1/4" pivot.> > Pictures 3 and 4 show detail of the cable assembly at the pedals. I flared theS.S. tube and added a washer to prevent the black cable sheath from moving underthe clamp when applying the brakes. Not shown is the other end of this flaredtube. ( But I do have a picture.) It is rolled inward to prevent the blacksheath from pushing out. The wood "U" shaped gusset it epoxied around the clampto prevent it from rotating around its mounting bolt.> > Pictures 5 and 6 show the completed assembly with epoxied "T" nuts and the underbelly fabric stringers.> > --------> Mike Perez> > > > > Read this topic online here:> > http://forums.matronics.com/viewtopic.p ... 237#466237> > > > > Attachments: > > http://forums.matronics.com//files/brake_452.jpg> http://forums.matronics.com//files/brake2_940.jpg> http://forums.matronics.com//files/brake3_626.jpg> http://forums.matronics.com//files/brake4_186.jpg> http://forums.matronics.com//files/brake5_117.jpg> http://forums.matronics.com//files/brake6_139.jpg> > > > > > ________________________________________________________________________________Subject: Pietenpol-List: Re: Front seat attach point
Pietenpol-List: Re: Front seat attach point
Original Posted By: "Speedbrake"
My mock fuselage made out of Home Depot fir and gorilla glue. Was a great help.Ended up widening my cockpit two inches, leaning the rear seat back a bit , raisedthe instrument boards, and a couple other small changes. Also since I hadnever built a wood aircraft before it helped me figure out the best way to cutthe longerons and gussets and fit things together generally before I startedcutting that expensive spruce.Rick H--------Rick HollandNX6819ZRead this topic online here:http://forums.matronics.com/viewtopic.p ... ttachments: http://forums.matronics.com//files/scre ... ___Subject: Pietenpol-List: Re: Front seat attach point
My mock fuselage made out of Home Depot fir and gorilla glue. Was a great help.Ended up widening my cockpit two inches, leaning the rear seat back a bit , raisedthe instrument boards, and a couple other small changes. Also since I hadnever built a wood aircraft before it helped me figure out the best way to cutthe longerons and gussets and fit things together generally before I startedcutting that expensive spruce.Rick H--------Rick HollandNX6819ZRead this topic online here:http://forums.matronics.com/viewtopic.p ... ttachments: http://forums.matronics.com//files/scre ... ___Subject: Pietenpol-List: Re: Front seat attach point
Original Posted By: helspersew(at)aol.com
Rob, I don't know that dimension off hand, but I can tell you a little about myprocess. In a nutshell, I adjusted my rudder cable lengths, rudder bar placementand integrated rudder bar stops/seat supports to fit me comfortably; whileconsidering seat cushions used and rudder travel. Of course all this was donewith the tail completely assembled and some trial/error.Those vertical seat supports that the rudder bar stops attach to could have beenmade wider, (as viewed along the roll axis) to stop the rudder travel "sooner"or to accommodate a rudder bar mounted closer to the seat. (Shorter person.)With the rudder bar/pedals against the aluminum stops, the rudder physicallystops about an inch away from the elevators.If needed, I can get you that "stop to bar center" measurement.--------Mike PerezRead this topic online here:http://forums.matronics.com/viewtopic.p ... ttachments: http://forums.matronics.com//files/rudd ... ______Date: Thu, 16 Feb 2017 07:00:34 -0500
Rob, I don't know that dimension off hand, but I can tell you a little about myprocess. In a nutshell, I adjusted my rudder cable lengths, rudder bar placementand integrated rudder bar stops/seat supports to fit me comfortably; whileconsidering seat cushions used and rudder travel. Of course all this was donewith the tail completely assembled and some trial/error.Those vertical seat supports that the rudder bar stops attach to could have beenmade wider, (as viewed along the roll axis) to stop the rudder travel "sooner"or to accommodate a rudder bar mounted closer to the seat. (Shorter person.)With the rudder bar/pedals against the aluminum stops, the rudder physicallystops about an inch away from the elevators.If needed, I can get you that "stop to bar center" measurement.--------Mike PerezRead this topic online here:http://forums.matronics.com/viewtopic.p ... ttachments: http://forums.matronics.com//files/rudd ... ______Date: Thu, 16 Feb 2017 07:00:34 -0500
Pietenpol-List: Re: Front seat attach point
Original Posted By: "jarheadpilot82"
Thank you Dan. The look is something I have always enjoyed and one of the firstmods. I wanted to try on the plane. I thought perhaps the covering and tape wouldbe an issue, but it went very "smoothly"...as it were.--------Mike PerezRead this topic online here:http://forums.matronics.com/viewtopic.p ... ttachments: http://forums.matronics.com//files/scal ... ___Subject: Pietenpol-List: Re: Front seat attach point
Thank you Dan. The look is something I have always enjoyed and one of the firstmods. I wanted to try on the plane. I thought perhaps the covering and tape wouldbe an issue, but it went very "smoothly"...as it were.--------Mike PerezRead this topic online here:http://forums.matronics.com/viewtopic.p ... ttachments: http://forums.matronics.com//files/scal ... ___Subject: Pietenpol-List: Re: Front seat attach point
Pietenpol-List: Re: Front seat attach point
Original Posted By: "Speedbrake"
Mike,I had not seen an update in a while, so I was wondering, what is the status ofyour Phase One flight test period? How does your Pietenpol fly?Enquiring minds want to know!--------Semper Fi,Terry HandAthens, GARead this topic online here:http://forums.matronics.com/viewtopic.p ... ___Subject: Pietenpol-List: Re: Front seat attach point
Mike,I had not seen an update in a while, so I was wondering, what is the status ofyour Phase One flight test period? How does your Pietenpol fly?Enquiring minds want to know!--------Semper Fi,Terry HandAthens, GARead this topic online here:http://forums.matronics.com/viewtopic.p ... ___Subject: Pietenpol-List: Re: Front seat attach point
Pietenpol-List: Re: Front seat attach point
Original Posted By: "Pietflyer1977"
Ah yes...flying. I can't seem to pull enough time and money together when I needto, so flight training and first flight has not happened. With the peeps nearingthe end of school and one leaving the house, we figured it best to spendsaid time/money taking family vacations/spending time together. Frustrating...youbet, but the right choice.All in due time...--------Mike PerezRead this topic online here:http://forums.matronics.com/viewtopic.p ... ___Subject: Pietenpol-List: Re: Front seat attach point
Ah yes...flying. I can't seem to pull enough time and money together when I needto, so flight training and first flight has not happened. With the peeps nearingthe end of school and one leaving the house, we figured it best to spendsaid time/money taking family vacations/spending time together. Frustrating...youbet, but the right choice.All in due time...--------Mike PerezRead this topic online here:http://forums.matronics.com/viewtopic.p ... ___Subject: Pietenpol-List: Re: Front seat attach point
Pietenpol-List: Re: Front seat attach point
Original Posted By: "taildrags"
Mike,Thanks for the info. Your process was pretty much what I was thinking of doing.Your pictures made me think I could get there a little quicker if you had a measurement.But after I posted the question also thought that everybody's is enoughdifferent that I'll have to make mine work for me. Your airplane looks great.I hope you get to enjoy flying it soon!RobRead this topic online here:http://forums.matronics.com/viewtopic.p ... ___Subject: Pietenpol-List: Re: Front seat attach point
Mike,Thanks for the info. Your process was pretty much what I was thinking of doing.Your pictures made me think I could get there a little quicker if you had a measurement.But after I posted the question also thought that everybody's is enoughdifferent that I'll have to make mine work for me. Your airplane looks great.I hope you get to enjoy flying it soon!RobRead this topic online here:http://forums.matronics.com/viewtopic.p ... ___Subject: Pietenpol-List: Re: Front seat attach point
Pietenpol-List: Re: Front seat attach point
Original Posted By: "at7000ft"
For any virtual pilots among us:I am selling my Saitek X52 Pro HOTAS. This system is in like new condition andfully functioning. Wood pedestal in pictures in not included, but I can custommake one for the buyer if needed. Latest software available for free downloadat the Saitek website.Shipping to contiguous 48 states only.Contact me off line if interested.--------Mike PerezRead this topic online here:http://forums.matronics.com/viewtopic.p ... ttachments: http://forums.matronics.com//files/hota ... ___Subject: Pietenpol-List: Re: Front seat attach point
For any virtual pilots among us:I am selling my Saitek X52 Pro HOTAS. This system is in like new condition andfully functioning. Wood pedestal in pictures in not included, but I can custommake one for the buyer if needed. Latest software available for free downloadat the Saitek website.Shipping to contiguous 48 states only.Contact me off line if interested.--------Mike PerezRead this topic online here:http://forums.matronics.com/viewtopic.p ... ttachments: http://forums.matronics.com//files/hota ... ___Subject: Pietenpol-List: Re: Front seat attach point
Pietenpol-List: Re: Front seat attach point
Original Posted By: "Pocono John"
Pocono John wrote:> Hello,> > I'm trying to understand the back part of the front seat bottom. Where is thepassenger weight going (besides that front support)? Where and how is the backof the seat attached? It appears it's going to be against the cross piece onthe seat back. Is the seat just glued to that? Looking at photos on the web don'thelp.> > Thank you,John - here is a picture of mine notice I added extra supports up from the bottomof the seat back (also shows how I attached my seat belts).Rick H--------Rick HollandNX6819ZRead this topic online here:http://forums.matronics.com/viewtopic.p ... ttachments: http://forums.matronics.com//files/scre ... ___Subject: Pietenpol-List: Re: Front seat attach point
Pocono John wrote:> Hello,> > I'm trying to understand the back part of the front seat bottom. Where is thepassenger weight going (besides that front support)? Where and how is the backof the seat attached? It appears it's going to be against the cross piece onthe seat back. Is the seat just glued to that? Looking at photos on the web don'thelp.> > Thank you,John - here is a picture of mine notice I added extra supports up from the bottomof the seat back (also shows how I attached my seat belts).Rick H--------Rick HollandNX6819ZRead this topic online here:http://forums.matronics.com/viewtopic.p ... ttachments: http://forums.matronics.com//files/scre ... ___Subject: Pietenpol-List: Re: Front seat attach point
Original Posted By: Andy Hoots
Thank you Rick!--------JohnRead this topic online here:http://forums.matronics.com/viewtopic.p ... __________
Thank you Rick!--------JohnRead this topic online here:http://forums.matronics.com/viewtopic.p ... __________